Family Friendly Nut-Free Granola
This homemade nut-free granola is packed with flavor! It contains oats, optional seeds, and coconut, offering the perfect crunch. Easy to make and fully customizable, it’s a great snack, breakfast, or yogurt topping all month long!
Ingredients
- 2 cups Rolled Oats
- 1/2 tsp Salt
- 2 tsp Cinnamon
- 1/4 tsp Nutmeg
- 1 tsp Sugar
- 1/3 cup Honey or Maple Syrup
- 1/4 cup Butter
- 2 Tbsp Water
- 1 tsp Vanilla Extract
Optional:
- Flax Seeds
- Sunflower Seeds
- Raisins
- Craisins
- Chocolate Chips
- Shredded Coconut
Instructions
- Preheat the Oven: Set your oven to 325°F (163°C). Line a baking sheet with parchment paper or a silicone baking mat to prevent the granola from sticking.
- Mix the Dry Ingredients: In a large bowl, combine the rolled oats, cinnamon, nutmeg, and salt. (Optional) sunflower seeds, pumpkin seeds, chia seeds, and or coconut flakes. Mix well to evenly distribute the dry ingredients.
- Add Wet Ingredients: In a separate smaller bowl, whisk together the maple syrup (or honey), melted butter, water and vanilla extract. Pour this wet mixture over the dry ingredients and stir to ensure everything is coated evenly.
- Spread the Granola: Pour the granola mixture onto the prepared baking sheet and spread it out into an even layer. Press it down slightly with the back of a spoon or spatula to ensure compactness.
- Bake: Bake the granola in the preheated oven for 20–25 minutes, stirring once halfway through to ensure even browning. Keep an eye on it, as granola can burn quickly. The granola is done when it’s golden brown and fragrant.
- Cool and Add Dried Fruit: Once the granola is finished baking, remove it from the oven and let it cool completely on the baking sheet. This helps it crisp up and become that perfect crunchy texture. Once cooled, add your dried fruit and mix it in gently.
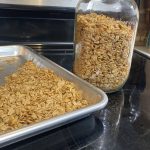
- Store: Store the cooled granola in an airtight container for up to two weeks at room temperature, or up to a month in the refrigerator. Extra: You could place granola in a mason jar, then use a mason jar vacuum sealer to remove the oxygen to store longer.